Welcome to my Cricut green spot on the planet

I am a self-confessed Cricut Addict with the need for a 12X12 Step Program!! The only thing that takes first place over my Bug is my Granddaughter! If you enjoy the projects please become a follower and leave a comment I LOVE comments!

Tuesday, September 13, 2011

Thank You Lisa B

A big thanks to Lisa B at Addicted to the Cricut for awarding my blog the "Butterfly Award"!


To accept the award, I must answer the following questions and then pass the award on to 10 other blogs.

1. Name my favorite color - Green
2. Name my favorite song - American Pie by Don Mclean
3. Name my favorite dessert - Anything Chocolate!
4. What 'wizzes' me off at the moment? People who hurt others just because they can!
5. My favorite pet - My cat Shadowline!
6. Black or white? ummm White
7. Biggest fear - Not to be able to visit my granddaughter on a regular basis
8. Best feature - My eyes
9. Everyday attitude - This is only temporary.. it will pass soon.
10. What is perfection? My beautiful daughter & granddaughter
11. Guilty pleasure - More Cricut Cartridges
12. When I am upset I... Cry


I would like to present the "Butterfly Award" to...

Brenda
http://enjoyingthebug.blogspot.com/

Patty
http://takemeawaycreations.blogspot.com/

Jenny K
http://kozfam5.blogspot.com/

Scrapalette
http://scrapalette.blogspot.com/

Julianna
http://17turtles.blogspot.com/

Veronica
http://veronicraft.blogspot.com/

Nanne
http://nannes-creations.blogspot.com/

Shannon\
http://my-o-scrappin.blogspot.com/

Audrey
http://www.thebugbytes.com/

Paula
http://www.owlbescrappin.com/

Saturday, September 3, 2011

Cricut, Cricut, Winning Ticket!!

First off let me thank everyone for coming to my blog and all the wonderful comments and for everyone that joined by blog. I hope that this will be the first of many of blog hops that I participate in and I am always on the lookout for things to use for blog candy I have a drawer of several things that I have found along the way.. not all are Cricut related but all are things I have in my collection too!

Now on to the winner...........

I had 65 comments and only 3 of those didn't become followers..... I had my daughter choose a number between 1 - 62.. She picked 9 because she was born on 9-9 so I counted down to the 9th comment of commenter's and checked to see if they were followers as well and they were so... 

the winner is ....................................................

Shannon Myiow


Congrats Shannon


I will be contacting you via email so I can send your cartridge out to you on Tuesday!

Saturday, August 27, 2011

Circut Circle Sisters Fall Blog Hop


Welcome to the Fall Blog Hop with Circle Sisters!
You should be coming from the very talented Nancy's Blog. If you've just happened to come across my blog please check out each of these talented ladies blogs. You will want to start at
Kristen's blog for the beginning of the hop.

***BLOG LINE UP***
1) Kristen
2) Michele
3) Roberta
4) Mary
5) Renee
6) Carolyn
7) Gamma
8) Colleen
9) DoodleDiva
10) Kimbe
11) Lisa
12) Gonecampn
13) Momto2cuties
14) Scrapalette
15) Paper Memories
16)Darcy
17)Lavendergal
19) HappyScrapper64
20) Madylyn
21)Nancy
You are here!
22)Debbie
Next stop!
23)Tracy
24)Sharon

Now for my blog candy
(My very first blog candy I might add)
A brand new never been opened Cricut Lite Cartridge
CUPCAKE

Rules: Only 3!
  • You must leave a comment (at the bottom of this post) - emails will not count'.
  • You must become a follower of my blog.
  • Please include your full name and your email in your comment so I can verify the winner.
I'll randomly pick a winner and announce the winners on Saturday, September 03, 2011
Good luck!

Now for my projects for this my very first blog hop!

I had the hardest time ever deciding which project I wanted to make for this blog hop. Did I wanna do a layout or did I wanna do a card or which type of the layout did I want to use.... SOOOO I came to the final decision to just use em' all! Please forgive me for using so many projects in this presentation and I hope you enjoy them as much as I enjoyed making them for you.

First up I have this brand new passion for Inky Antic Rubber Stamps... The Honey Pop Collection. I used DCWV paper and copic markers. The cut out on the front of the card was done using spellbinders and my cuttlebug.


I love how you open the card up and find the 3-D surprise inside! I used Diamond Glaze to make the bubbles look shiny I love that stuff!


Next project stars my beloved Cricut! The layout was created with We R Memory Keepers paper and the Paper Dolls cartridge. Of course the faces were created with my Peachy Keen face stamps.


This layout was created using the Happily Ever After cartridge. It is the pumpkin from the Cinderella section on page 40 of the handbook. The paper piecing was not as hard as I first imagined it would be.


This layout is all ready to add pictures from this year's Thanksgiving Dinner! The title says it all. I made the Gobble from the Speaking of Fall Classmate cartridge. I bought this cartridge just for the fall alphabet on it.


Last but not least - Simply Charmed is the cartridge that has this cute title and pumpkins on it. They are bit comical and look more like oranges than pumpkins to me but I am going to use pictures from an up coming crop that I am attending on these pages!


Thanks for coming by and visiting my blog. Now move on to the next spot on the blog hop...Tracy my most talented Circle Sister I am positive she will have wonderful projects for you to view!

Tracy

Sunday, July 31, 2011

Vinyl Tutorial

Some of you asked about putting the vinyl on the wall and how easy or how hard it is to do. I do not have a camera where I can video this so I took pictures of each step and will explain them to you as I go. I hope this helps... If you try it be sure and let me know how it turned out for you! and Thanks for stopping by!!

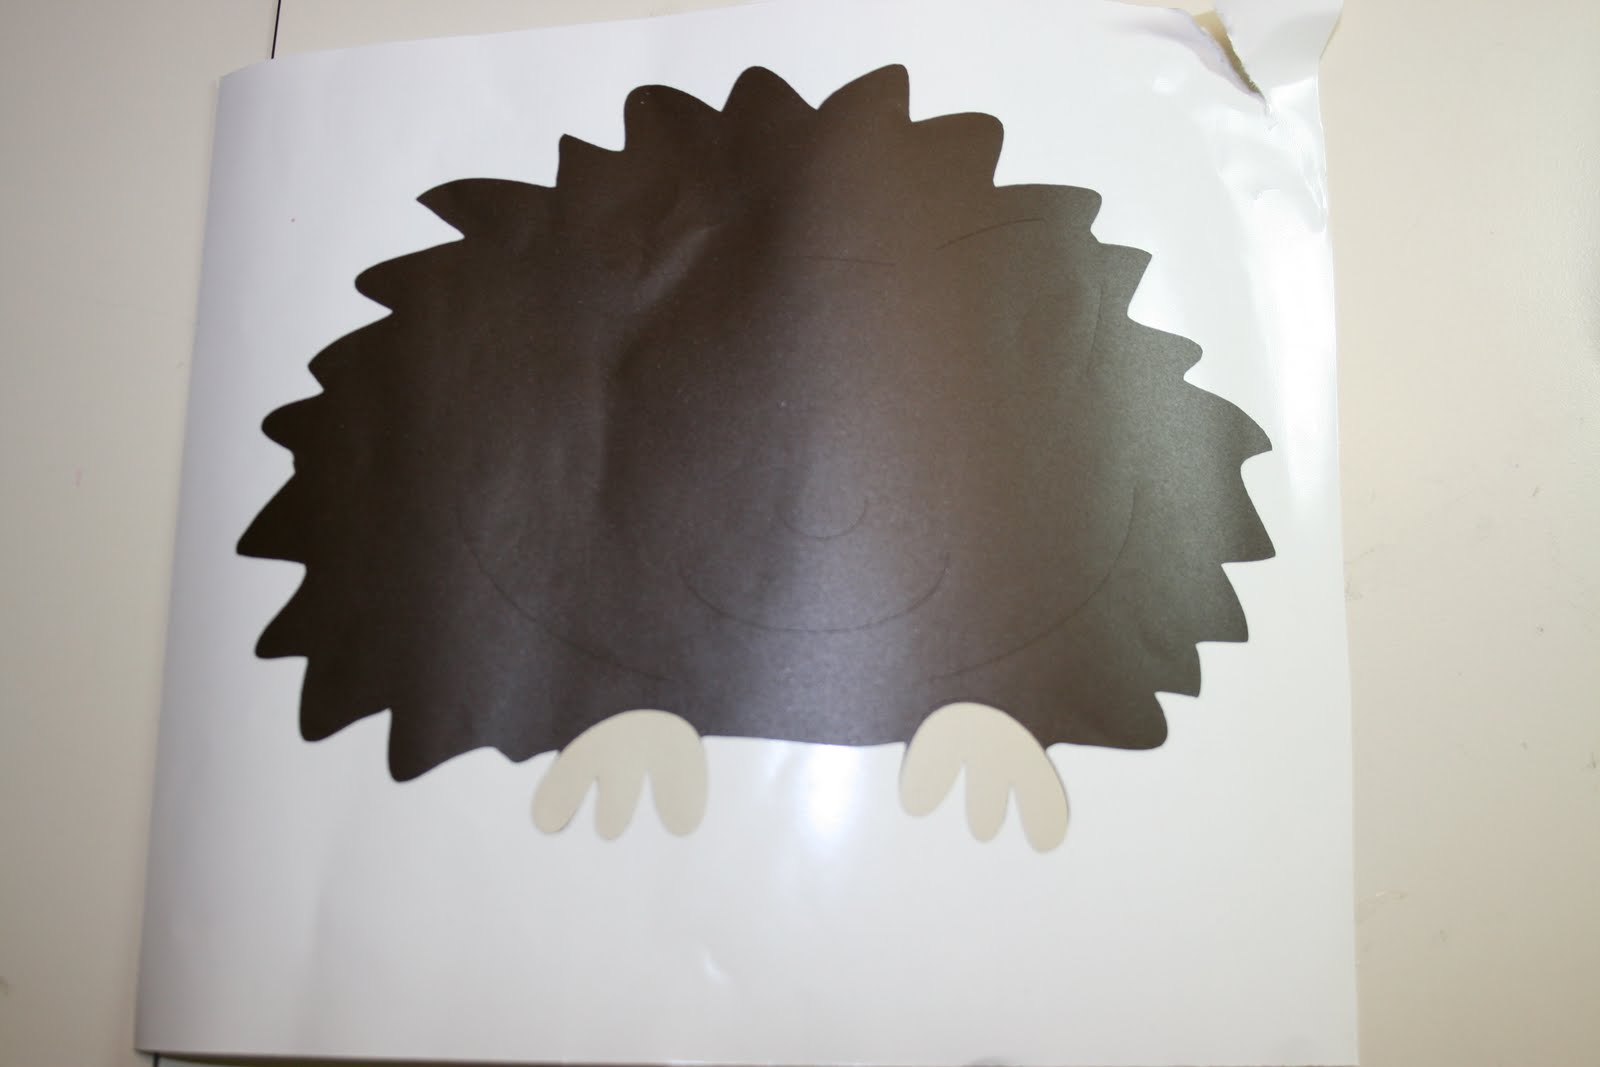
First I cut all of the pieces needed to create my hedgehog for Olivia's wall. I used my blade on 3 and my pressure on 3. When I finished cutting all the pieces the first thing I did was remove the excess vinyl leaving only the image I am going to put on the wall.


Begin by choosing the base piece of your image. Here I used the piece that I will add the layers to one by one. Lay the piece out still attached to the vinyl backing.


I choose the feet to add to the base. I take those pieces off the backing and place them on the base as I would if I were paper piecing.

Continue adding the layers to complete the item. Here I have layered the face and the snout.

Keep adding the layers, here the eyes, pink of the ears and nose, he is beginning to take life! I think in my final image I used my circle punch to cut out dark dots to put in the center of those light colored eyes. I don't know why that picture wasn't added.

Once you get to this spot you just pull the entire item from the backing. At this point the piece is a bit easier to manipulate I guess because it has more body to it from the added layers. Just place it on your wall where you would like it to be. smooth out all the hair bubbles with either a dull side of your cell phone or a Popsicle stick. I hope you will try this out because it truly is easier than I would have imagined.
If you have any questions or comments don't hesitate to do that. I may not know the entire answer but I will attempt to find it for you

Tuesday, July 12, 2011

CHA Roadtrip Penndant Entry

Ok here is my Penndant for the Roadtrip Contest. I have titled it all about Kentucky!.. In the mail it goes tomorrow! Wish me luck! I have NEVER done anything like this before!

Thursday, June 23, 2011

Pretty Purple Birthday Card Challenge

I did this for a Pretty Purple Birthday Card Challenge over at

http://www.fancyframework.com/2011/06/pretty-purple-birthday-challenge.html
Come on over and see the creations!!

The criteria was to use purple, ribbon and bling and as you can I see I have met all 3 requirements! Come join the fun!

Thursday, May 26, 2011

Liv's Room Part 2

Here is the second part to Olivia's room... It is a work in progress when we get things up we think you know this would be nice or that would be nice... when she is 16 we may have it just perfect! hahaha
I tried to do a tutorial but I didn't have anyone to take pictures for me... When I do the hedgehog I am going to add those directions in tutorial form.. hopefully this weekend!


Going to add a hedgehog to the grass along with some flowers on the next go around..


These little love birds are over her door. The next time I go down I'm going to cut a heart to place over the top of them..


This last little leaf was Olivia's contribution.. I had put things up on the wall and she was chirping around saying "I help Nana,,,I gonna help Nana" so I handed her that little leaf to "hold" for me.. it was an extra leaf I wasn't going to use so if she ripped it no biggie.. I turned around and she had hopped off the bed and found her a small spot on the wall at the foot of the bed and she put her addition up! I thought it was so cute and had to take a picture of it!!


So there you have it! I hope you enjoy. I am really having a good time working in her little room! My inspiration, Olivia,  is such a joy to work for!