Welcome to my Cricut green spot on the planet

I am a self-confessed Cricut Addict with the need for a 12X12 Step Program!! The only thing that takes first place over my Bug is my Granddaughter! If you enjoy the projects please become a follower and leave a comment I LOVE comments!

Monday, January 17, 2011

Olivia - my Beautimus Tiny Dancer!!

After all the bad press with the "Shall We Dance" cartridge I thought maybe I would try a page with it.. I was surprised at how many things I could use on this layout from that cartridge. I do have the perfect picture for that cartridge though :-)


I use a lot of brands of rubber stamps but my favorite brand by far is TECHNIQUE TUESDAY. The background on the white strip was made with a group of their stamp sets that I pulled one from this set and one from that set. I have decided if I can't find the right background paper I can pull out my stamps and create it! I encourage you all to give it a try.

The dancers along the side of the layout are all from Shall We Dance.. I used glitter to dress up the tutu


This title came from "Once Upon a Princess" I dressed up the bows with my I-Rock which I have decided is a pretty good investment! The only problem I have is chasing the little blings down. If anyone has a great way to add them to a page I would LOVE to know what it is. The ballet slippers came from "Shall We Dance".

I just love these little dancers! I can't wait for Olivia to see them I think she will like them too!


Again I used my Technique Tuesday stamps to make a co-ordinating piece for the second page of my layout.

I think the papers are from K & Company... At least I know the floral piece is.
I hope you enjoy this layout, pink and brown is one of my favorite color combinations for little girls.

Thursday, September 30, 2010

Halloween Pumpkins

Cut these images from vinyl for my bosses wife... We put them on her pumpkins today... I love them!
These spiders were sooo realistic that they gave me the willies pulling them off the vinyl! The vinyl was just movable enough to tell my eyes they were moving on their own! UGH!!


The spider and the small "corner " web are from October 31 and the rest of the cuts are from Pumpkin Carving... I cant wait to do my pumpkins!

Monday, August 9, 2010

Found a Peanut Found a Peanut Found a Peanut Just Now


Do you remember that song as a kid? It conjoured up all these pictures of some poor soul finding a peanut eating and then getting sick! Poor fellow!. Not this peanut he is the cutest ever. Thanks goes to Pat P for showing me how to use the cuttlebug and the mesh folder to create a true peanut shape! The peanut was cut from Create a Critter and then I stamped the faces with Peachy Keen face stamps (the greatest ever) and then lay them in the mesh cuttlebug folder and ran in through the cuttlebug. Be sure that the face side is on the side that makes the embossing down in the paper. In other words make sure the dimples are down not up. I had to redo mine because they looked better that way in my opinion. This picture makes it look like the dimples are raised but its quite the opposite.


Nana and is was cut from the Cuttin Up cartridge and go really well with the font of the the Nuts about you piece that is cut also from the create a critter.


I went ahead and ran the word nuts and the circle around the U through the cuttlebug too so they look like the peanut as well.


The little elephant is also from Create a Critter he reminds me of dumbo!

I like the way it turned out! And never a truer word was spoken than the one here because I am truly nuts about Miss Olivia!

Thursday, August 5, 2010

Nana's Sleeping Angel!

Took me virtually all weekend to get this just the way I wanted it to be... but I am quite pleased with the end result. The paper was some I had gotten of QVC before they went out of the scrapbooking business and I fell in love with it!. The angel wings and wing corner pieces came from the new Picturesque cartridge which is an absolute dream of a cart! The font is Lovely Floral which is one of the walmart lite carts and when you pick up the font you have to look closely to see what font is there but its a gorgeous font! So elegant! The paper I used to make the angel wings and corners is from the Shimmer paper pack from DCWV.


I layered one of the cuts on top of the other to make the textured wings and to give them depth. I started to ink them but was so happy with the results I bypassed the ink. They shimmer enough with just the paper.


This was a bit tricky.. I had to lay my picture down on the purple paper then add the corner pieces and trim them down so it turned out like this...


Someday I am going to be shot for using this picture of her in a scrapbook much less posting it out there for you to see too.... OH WELL the price a Nana pays for the cute shots! I hope you enjoy this layout. I am planning on putting in a 12x12 frame for my scrapbook room for awhile...

Tuesday, August 3, 2010

Gettin in the Halloween Spirit!

I was at a SWARM this weekend and one of the make n' takes was this Halloween layout.. I decided to embellish it up and add some of my cricut style to the layout along with Liv's first Halloween pictures. The cartridges I used was the Original Paper Dolls along with Black letter for the font. I think the Black letter turned out to be a fantastic font for Halloween. Can't wait for the new Halloween cart to get here because I love the fonts on it. Anyway here is my creation! I hope you enjoy
The pumpkin and the black glob (which is supposed to be a spider but obviously I don't know how to stamp with paint ) were stamped with foam stamps using black paint... Not one of my greatest mediums. I think personally the foam stamps are hard to work with and are too "squooshie" when you press them down..


I love this picture of Olivia looks like she is really in the Halloween spirit and screaming at that spider!

The mummy became part of my journaling tools I love that fellow I have used him several time

The cat and the bats were super easy to cut out, I did use my gypsy for all cuts and the cat was cut once in black then again in white to make the whites of his eyes.. I did use the hide contour and took all but the outside lines off him before I cut it out. The cat has what was left of my white pen to make the high lights
Thanks to Erica and Jill for making the the make in take! And of course all the credit goes to my gypsy and cricut for the rest of the layout! I hope you enjoy!

Wednesday, July 14, 2010

Sugar N Spice and Everything Nice

This week I used again a couple of carts. I used the new Cricut Lite Sugar and Spice cartridge along with Everyday Paper dolls and Hello Kitty Font.
I must put a plug in for the gypsy because it made cutting out the different colors a DREAM! I used the hide show feature to hide the pieces I wanted to cut a different color. For example the stork is carrying a bundle, when you pull that cut up the bundle has he hole in it for the background paper to show through. I used the hide function to NOT cut the hole out so that when I layered it with the lighter pink the dark is in the back... like the background feature. I am telling you if you don't already own a gypsy THIS IS A MUST HAVE!!!


The hospital is from Everyday Paper Dolls and the font is Hello Kitty


Some of the other cartridges have storks but I believe this one is my all time favorite.. it comes from Sugar and Spice and he has real character!


Forgive the delay on this layout being posted but I just started a new job and I am having a time adjusting to the new hours.... I hope you enjoy this page as much as I enjoyed putting it together! Happy Scrappin!

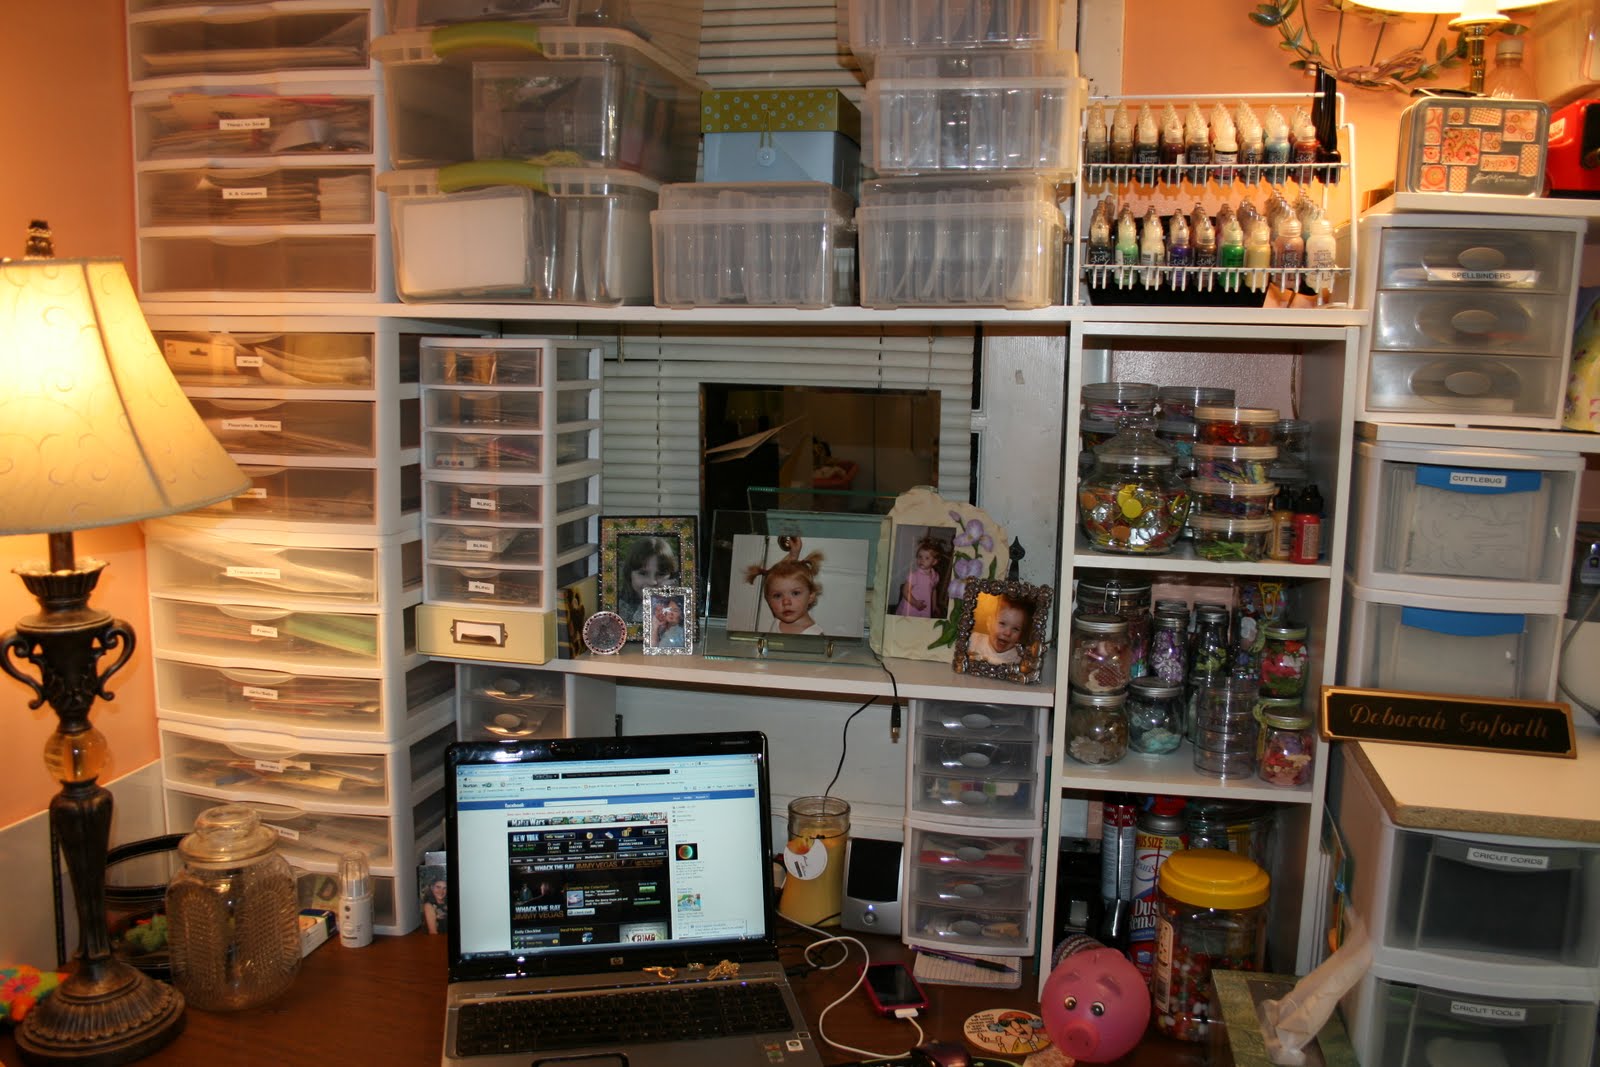
My New Scrap Home!

I have been working on my scrapbook room for quite a few months now trying to get just the right look and feel to what I want.. I think I made it.. Here are a few pics of "MY SCRAP HOME" I hope you like it... while it's not fancy it is the place I go to be with my favorite toys my Create, Expressions, and of course the Gypsy! They have the absolute center of the room and I built all my other sections around the stars of my room!


This is my stickles storage along with my prized Tim Holtz tin I made at CHA a couple years ago... I am a Tim Fan too


This is my rubber stamping area... Those are my stamps in the binders on the first shelf.. my ink pads are sitting under that shelf on the desk behind the light.. above those are my pens, chalks, and anything I need to stamp out my creations. The plastic drawers hold other goodies, scissors, clear stamp blocks. I have my wooden blocks in a drawer under the table!


This is my scrap area to the left of my cricut area... This is where I Put my pages together


This is under my cricut station... It's the papers I have that are in pads. The drawers under them are for border strips, mat stacks, and you can see tomatoes my Mom canned for me peeping out at you! Thanks Mom~!


This is my computer area where I sit and look at cricut.com! although that is Facebook and mafia wars up there on the screen now!


The next three pictres are of my various punch and embelishment storage... alot to keep me busy!